目次
【Ubuntu編】エックスサーバーVPS(XServer VPS)にPHPとMySQL(MariaDB)をインストールする方法
こちらのページでは、エックスサーバーVPS(XServer VPS)を利用している方向けにPHPとMySQL(MariaDB)をインストールする方法説明します。
OSには「Ubuntu」を利用しています。
PHPのインストール

PHPをインストールする前に、パッケージに含まれるPHPのバージョン情報をチェックしてみましょう。
# sudo apt show php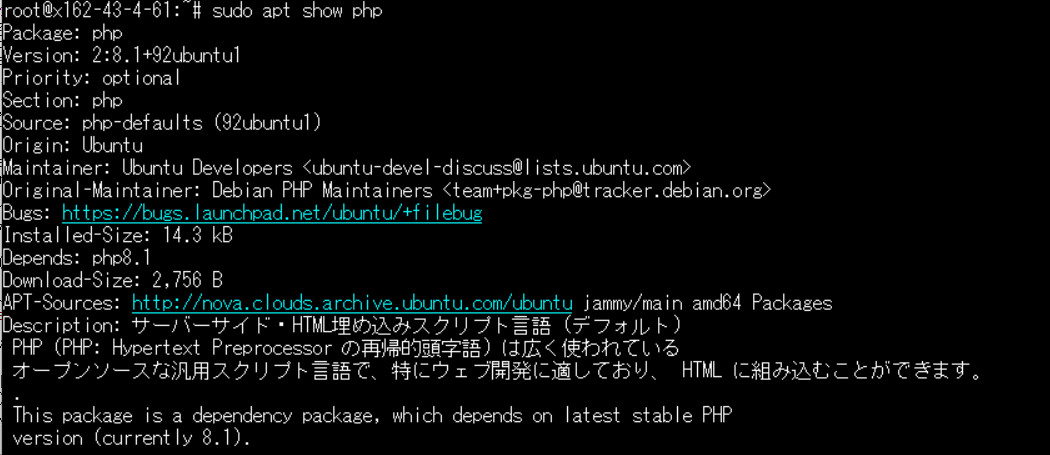
Version: 2:8.1+92ubuntu1
Priority: optional
Section: php
Source: php-defaults (92ubuntu1)
Origin: Ubuntu
Maintainer: Ubuntu Developers
Original-Maintainer: Debian PHP Maintainers
Bugs: https://bugs.launchpad.net/ubuntu/+filebug
Installed-Size: 14.3 kB
Depends: php8.1
Download-Size: 2,756 B
APT-Sources: http://nova.clouds.archive.ubuntu.com/ubuntu jammy/main amd64 Packages
Description: サーバーサイド・HTML埋め込みスクリプト言語 (デフォルト)
PHP (PHP: Hypertext Preprocessor の再帰的頭字語) は広く使われている
オープンソースな汎用スクリプト言語で、特にウェブ開発に適しており、 HTML に組み込むことができます。
.
This package is a dependency package, which depends on latest stable PHP
version (currently 8.1).
これでPHP8.1.xxがインストールされることが分かりました。
ですが、PHPの正確なバージョンまでは分からないようですね。
ここは、実際にPHPのインストールを行ってから確認するようにしてみましょう。
# sudo apt-get install -y phpこの1行を実行するだけでPHPのインストールが完了します。
デフォルトでインストールされているモジュールもありますが、不安であればWordPressで利用しそうなモジュールを明示してインストールしておきましょう。
これでPHP本体と一緒にインストールされます。
# sudo apt-get install -y php
インストールされたPHPのバージョンも確認しておきましょう。
# sudo php -v結果はこちら。

Copyright (c) The PHP Group
Zend Engine v4.1.2, Copyright (c) Zend Technologies
with Zend OPcache v8.1.2-1ubuntu2.8, Copyright (c), by Zend Technologies
PHP8.1.2がインストールされたようですね。
/etc/php/8.1/apache2/php.ini
※PHPのバージョンによって保存先が異なることもあるので、ここにphp.iniがない場合には別途調べてみてください。
これで、PHPのインストールは完了です。
次は、MySQL(MariaDB)のインストールを行っていきます。
MySQL(MariaDB)のインストール
それでは、MySQL(MariaDB)をインストールしていきます。
因みに、MySQLと言っていますが、正確にはMariaDBというデータベースソフトになります。
MariaDBは、MySQLと高い互換性を持つデータベースで
# sudo apt-get install -y mysql-server mysql-client
インストールされたMySQLのバージョンも確認してみます。
# sudo mysql --version結果はこちらです。
↓
![]()
「mysql Ver 8.0.31-0ubuntu0.22.04.1 for Linux on x86_64 ((Ubuntu))」と表示されましたね。
これでMySQLが正常にインストールされたことも確認できました。
ただ、これで終わりではありません。
この時点では、MySQLのrootユーザーにパスワードが設定されていない状態になります。
そこで、「mysql_secure_installation」というコマンドを実行して、rootユーザーのパスワードの設定を行っておきます。
また、このコマンドではパスワード以外にもいくつかの初期設定を行うことができます。
# sudo mysql_secure_installationここからは、対話形式で設定を行っていきます。
以下のように回答していってください。
and improve security. It checks the strength of password
and allows the users to set only those passwords which are
secure enough. Would you like to setup VALIDATE PASSWORD component?
Press y|Y for Yes, any other key for No:
→「y」を入力してEnter
↓
There are three levels of password validation policy:
LOW Length >= 8
MEDIUM Length >= 8, numeric, mixed case, and special characters
STRONG Length >= 8, numeric, mixed case, special characters and dictionary file
Please enter 0 = LOW, 1 = MEDIUM and 2 = STRONG:
→「2(STRONG)」を入力してEnter
ここではセキュリティレベルの設定になるので、一番強い「2」をおすすめします。
↓
New password: →rootのパスワードを入力します
Re-enter new password: →上記と同じrootのパスワードをもう一度入力します
※rootユーザーのパスワードは任意ですが、複雑な文字列のパスワードを設定するようにしましょう。
↓
Estimated strength of the password: 100
Do you wish to continue with the password provided?(Press y|Y for Yes, any other key for No) :
→「y」を入力してEnter
「100」というのは設定したパスワードの強度を表していて、「100」はいい方の評価値です。
また、ここでは設定したパスワードで確定するかを回答することになるので「y」と答えてください。
因みに、ここで「y」を入力しても再度パスワード設定画面が出て、先に進めないというループが発生することもあります。

この場合のエラー対応は、こちらで説明を行っているので参考にしてください。
↓
By default, a MySQL installation has an anonymous user,
allowing anyone to log into MySQL without having to have
a user account created for them. This is intended only for
testing, and to make the installation go a bit smoother.
You should remove them before moving into a production
environment.
Remove anonymous users? (Press y|Y for Yes, any other key for No) :
→「y」を入力してEnter
anonymousユーザーの削除を行うかどうかの確認になります。
↓
Normally, root should only be allowed to connect from
'localhost'. This ensures that someone cannot guess at
the root password from the network.
Disallow root login remotely? (Press y|Y for Yes, any other key for No) :
→「y」を入力してEnter
リモートからの接続でのrootユーザーのログインを禁止にします。
↓
By default, MySQL comes with a database named 'test' that
anyone can access. This is also intended only for testing,
and should be removed before moving into a production
environment.
Remove test database and access to it? (Press y|Y for Yes, any other key for No) :
→「y」を入力してEnter
デフォルトで作成されている「test」というデータベースを削除するかどうかの質問です。
testデータベースは不要なので「y」を入力して削除してしまいましょう。
↓
Reloading the privilege tables will ensure that all changes
made so far will take effect immediately.
Reload privilege tables now? (Press y|Y for Yes, any other key for No) :
→「y」を入力してEnter
最後に、MySQLの権限テーブルの権限テーブル更新をするかを聞かれるので、「y」と答えて終了します。
最後に、念のために上記で設定したパスワードを使ってMySQLへ接続できるかの確認だけ行っておきます。
# mysql -u root -p↓
ここで、「Enter password:」とパスワードを聞かれるので、設定したrootユーザーのパスワードを入力してenterしてください。
「Welcome to the MySQL monitor・・・」と出たら、MySQLへの接続が完了になります。
「mysql_secure_installation」の実行で以下のようなエラーが出て設定をすすめられない場合があります。
... Failed! Error: SET PASSWORD has no significance for user 'root'@'localhost' as the authentication method used doesn't store authentication data in the MySQL server. Please consider using ALTER USER instead if you want to change authentication parameters.
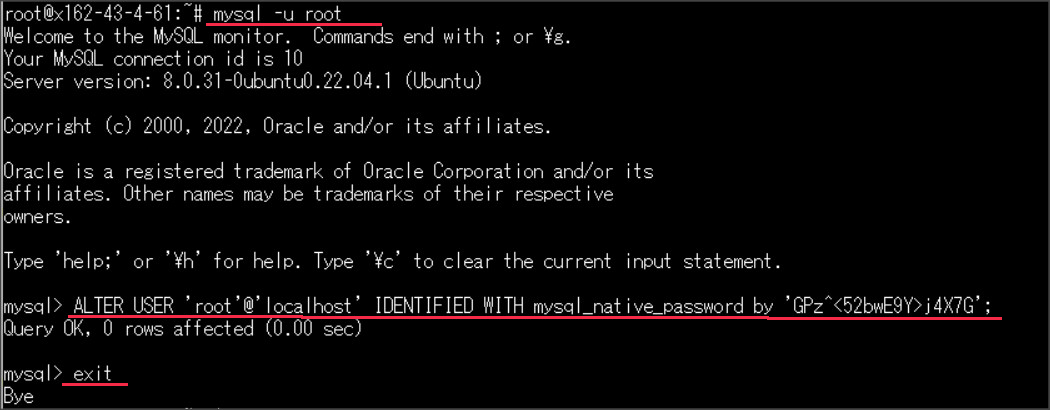
この場合には、先にrootユーザーのパスワード設定を行っておきます。
■パスワードなしでMySQLへ接続
# mysql -u root↓
■rootにパスワードを設定するSQLを実行
mysql> ALTER USER 'root'@'localhost' IDENTIFIED WITH mysql_native_password by 'rootのパスワード';↓
■MySQLを抜ける
mysql> exit;これで、rootユーザーへのパスワード設定が完了しました。
まとめると、このような感じで進めていくことになります。
そして、再度「mysql_secure_installation」を実行して、MySQLの初期設定を続ければOKです。
# sudo mysql_secure_installation
まとめ
こちらのページでは、OSとしてUbuntuを利用されている方向けに、PHPとMySQLのインストール方法をまとめました。
PHPのインストールは恐らくあっさりと完了すると思いますが、MySQLのインストールでは初期設定なども必要になるので少し手間取るかもしれないです。
ですが、落ち着いてすすめれば作業に30分も掛からないので、挑戦してみてください。


